Add Bleed on Photoshop – Adding bleed to your designs in Photoshop is crucial for ensuring your printed products, like business cards, brochures, or flyers, look polished and professional.
Bleed refers to the extra space around the edges of your design that ensures no white borders appear after trimming.
Here’s a step-by-step guide on how to do bleed in Photoshop, particularly for business cards and other print materials.
What is Bleed in Printing?
Bleed is an area outside the final size of your document, usually between 1/8″ (0.125 inches) to 1/4″ (0.25 inches), that allows for slight movement during trimming.
This extra space ensures that no unprinted edges or white borders appear on the final product.
How to Create Bleed in Photoshop
Open a New Document
Begin by opening Photoshop and creating a new document. Set your desired document size according to the final trim size, such as a business card or flyer.For example, when creating a business card, the standard size is 3.5″ x 2″ without bleed. However, to include the bleed, you’ll want to add an additional 0.125 inches on all sides.
Measurements for Business Cards on Photoshop:
For a business card with bleed, the dimensions would be:
With Bleed: 3.75″ x 2.25″
Final Trim Size: 3.5″ x 2″
Set the Bleed Area While Photoshop doesn’t have a dedicated “bleed” setting like other design software, you can create bleed manually. Here’s how:
After setting your dimensions (e.g., 3.75″ x 2.25″), ensure your resolution is at least 300 DPI for high-quality printing.
Add guides for the bleed area. Go to View > New Guide and add horizontal and vertical guides at 0.125 inches from each edge of the document to mark the safe zone and bleed.
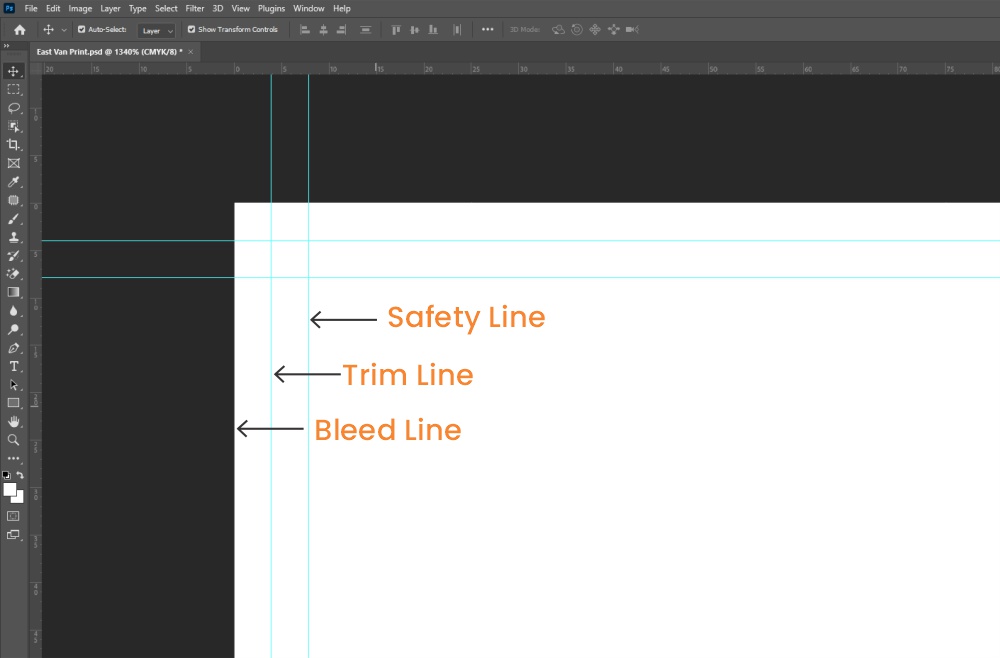
How to Set Bleed in Photoshop:
To manually create bleed lines, calculate the bleed dimensions and use rulers and guides to place them properly. Pull down the rulers from the top and side of the canvas (press Ctrl+R or Cmd+R if the rulers aren’t visible).
Place the guides 0.125 inches inside the edges.
Add Your Design Elements Make sure all important design elements, like text and logos, stay within the safe zone, which is 0.125 inches inside the trim lines. Any background images or design elements that extend to the edges should stretch into the bleed area.
How to Add Bleed Marks in Photoshop:
Ensure your design extends beyond the bleed lines so that when the card is cut, there is no unwanted white border.
Don’t place critical content within the bleed; only extend background images or design elements meant to touch the edge.
Export Your Design Once you’re satisfied with your design, it’s important to export the file correctly for printing.
Go to File > Save As and select the PDF format, ensuring all layers are flattened.
In the PDF settings, make sure to check the box for Crop Marks and Bleed Marks under the “Marks and Bleeds” section. This ensures that your file is properly prepared for printing.
Why Bleed is Important for Printing
Without proper bleed setup, you risk having white edges or misaligned prints on your final product. By setting up bleed correctly, you avoid this issue and ensure your design runs cleanly to the edge of the paper.
Common Mistakes to Avoid When Adding Bleed in Photoshop
While adding bleed to your designs is essential, there are common pitfalls to be aware of when preparing files for print.
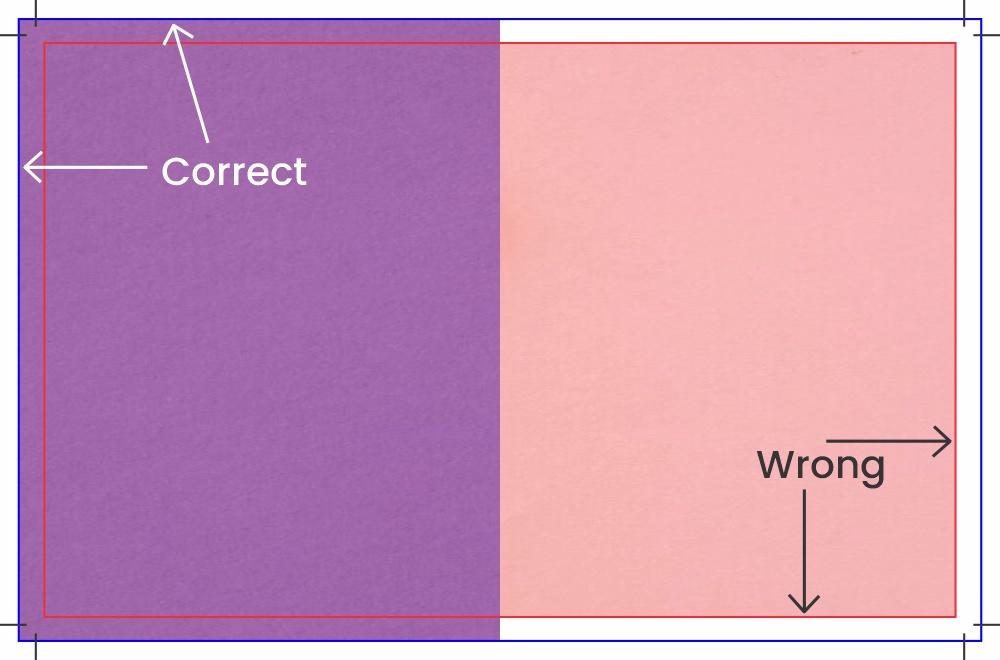
Not Extending Design to the Bleed Area
One of the most frequent mistakes is failing to extend the background or design elements into the bleed area. Remember, the bleed exists to ensure that any slight misalignment during trimming doesn’t result in white edges. Always make sure that your design elements stretch at least 0.125 inches beyond the final trim size.
Placing Important Content Too Close to the Edge
Keep vital elements, like text or logos, well within the safe zone (inside the bleed and trim lines). Anything too close to the edge may be cut off, especially if there is any slight variation during the trimming process.
Low Resolution
Always ensure your design is set to 300 DPI (Dots Per Inch). A lower resolution may appear acceptable on screen, but it will result in blurry or pixelated prints. For professional results, 300 DPI is the industry standard for print.
Forgetting to Add Bleed Marks or Crop Marks
When exporting your design, always double-check that you’ve included bleed and crop marks in your PDF export settings. These marks guide the printer and cutter on where to trim, ensuring accurate cuts for your business cards, flyers, or other printed materials.
Additional Tips for Creating Business Cards with Bleed in Photoshop
Business Card with Bleed Size:
The bleed size for most business cards should add 0.125 inches to each side. For example, a standard business card’s final trim size is 3.5″ x 2″, but with bleed, the document size should be 3.75″ x 2.25″. This extra space ensures a perfect, edge-to-edge finish when the card is cut to its final size.
Use Smart Guides and Rulers:
Utilize Photoshop’s smart guides and rulers to precisely place your bleed and trim lines. This ensures that your design aligns correctly and gives you a visual representation of the trim zone.
Create Templates for Consistency:
If you’re regularly designing items with bleed, consider creating a template in Photoshop with the bleed and safe zones already defined. This can save time and ensure consistency across multiple designs.
Final Thoughts About Add Bleed on Photoshop
Knowing how to set bleed in Photoshop is a valuable skill for anyone working on print projects, especially for business cards and other marketing materials.
By following these guidelines, you can create professional designs that print perfectly, without unwanted white edges or incomplete backgrounds.